Apart from other options in a post, Blogger provides options that control the way user can choose to publish a post. These options are not related to the formatting or design to a post. This post discusses the way these different post options and how they work.
For example, a post called "How To Post Tulips In Your Backyard" can have the label "Flower". Other examples of labels for this post are Tulips, Gardening, How-To, Tutorials, etc. The list can consist of any word that qualifies being able to define what the whole post or any part of this post is about.
In order to add a new label into your blog post, click on the text "Label" in the right hand side pane of your Blogger post editor. This opens a text box area for you to enter a label or a group of labels (separated by comma) to enter. When you are done entering label(s) for this post, click on Done button.
You can always go back and add/edit/remove labels by clicking on the text "Label" in the Post Settings section and clicking Done button to confirm.
Blogger allows you to add phrases as labels. You can use spaces between words. Please read "Blogger Labels: Best SEO Practices" (coming in later sections) on how to create a label name.
By default, post schedule is "Automatic" which means that the post is published when user clicks on 'Publish' button on top of the post editor. The image below shows Schedule tab in Post Settings section.
When user selects the option "Set date and time", Blogger displays date and time controls to the user. User can specify both the date and time of a post. Using the calender control, user specifies any date. If a user specifies a previous date or same date with some previous clock time, the post still gets published instantly. The only thing to keep in mind is that your Blogger blog will always display all posts in exact chronological order with respect to time and date.
When a user specifies a future date/time and clicks 'Publish' button, the post does not get published. It will be posted on the designated time. Till the time a post scheduled for some future time is published, Blogger list of posts displays this post marked as 'Scheduled'. See below.
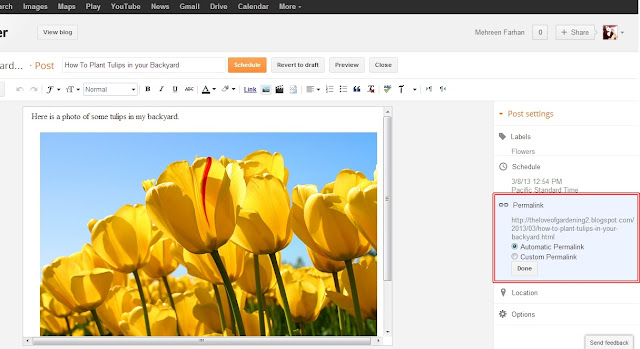
The following image shows when user has added a post title. Blogger uses this title to create an automatic post URL.
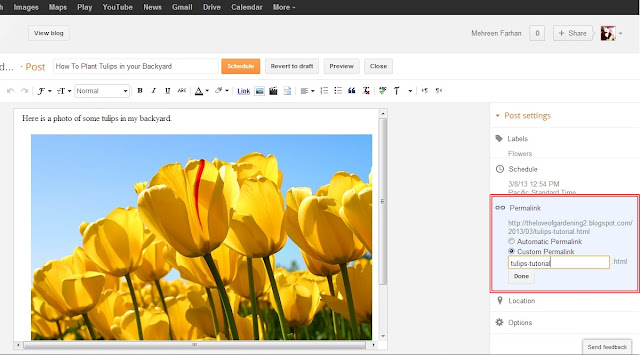
If the user wants to add his or her own custom link, simply select the option 'Custom Permalink'. User enters a custom link (ideally separated by dash '-' ) and clicks on Done button.
See more on how to construct meaningful and SEO friendly URLs for your posts in the coming sections.
When you find your desired location, click on 'Done' button. This will append your specified location with the post when it is published.
You can always come back and edit this location if changes are needed.
These are the post setting options which are available in the new Blogger layout. Try these out for more fun features.
Adding Labels To Posts
Blogger enables user to add labels or tags to all posts. A label or tag is important to categorize your posts in any way you like. Not only do they help to classify posts, tags and labels are useful SEO practices as they help Google recognize what a blog post is about.For example, a post called "How To Post Tulips In Your Backyard" can have the label "Flower". Other examples of labels for this post are Tulips, Gardening, How-To, Tutorials, etc. The list can consist of any word that qualifies being able to define what the whole post or any part of this post is about.
In order to add a new label into your blog post, click on the text "Label" in the right hand side pane of your Blogger post editor. This opens a text box area for you to enter a label or a group of labels (separated by comma) to enter. When you are done entering label(s) for this post, click on Done button.
You can always go back and add/edit/remove labels by clicking on the text "Label" in the Post Settings section and clicking Done button to confirm.
Blogger allows you to add phrases as labels. You can use spaces between words. Please read "Blogger Labels: Best SEO Practices" (coming in later sections) on how to create a label name.
Scheduling Posts
There are many cases when you may want to time your posts. Or you might be expecting a busy weekend, so you decide to write your weekend post a day or two before. Blogger helps users meet such varying requirements by giving them the facility to time or schedule their posts.By default, post schedule is "Automatic" which means that the post is published when user clicks on 'Publish' button on top of the post editor. The image below shows Schedule tab in Post Settings section.
When user selects the option "Set date and time", Blogger displays date and time controls to the user. User can specify both the date and time of a post. Using the calender control, user specifies any date. If a user specifies a previous date or same date with some previous clock time, the post still gets published instantly. The only thing to keep in mind is that your Blogger blog will always display all posts in exact chronological order with respect to time and date.
When a user specifies a future date/time and clicks 'Publish' button, the post does not get published. It will be posted on the designated time. Till the time a post scheduled for some future time is published, Blogger list of posts displays this post marked as 'Scheduled'. See below.
Adding Custom Links To Posts
Blogger gives the facility to add custom links to posts. This is a recently added feature into Blogger. By default, the 'Permalink' section is set to Automatic Permalink. This setting takes the blog title of your post or the first few characters of the post content when there is no title and makes a post URL out of it.The following image shows when user has added a post title. Blogger uses this title to create an automatic post URL.
If the user wants to add his or her own custom link, simply select the option 'Custom Permalink'. User enters a custom link (ideally separated by dash '-' ) and clicks on Done button.
See more on how to construct meaningful and SEO friendly URLs for your posts in the coming sections.
Adding Location To Posts
Use the 'Location' section in Post Settings panel to add location to your posts. This widget enables a user to search for a location, zoom in and zoom out a location on map as well as toggle between two views: Map and Satellite. You can find a location by moving the map with the hand cursor and zooming in/ zooming out or you can type a location name and search for it.When you find your desired location, click on 'Done' button. This will append your specified location with the post when it is published.
You can always come back and edit this location if changes are needed.
More Post Options
Apart from the posting options just described above, Blogger sums up some miscellaneous options into the section 'Options'. This section includes the following options:1. Reader Comments:
Change this option to suit whether you want people to be able to add comments to this post or not.2. Compose Mode:
Choose to whether display HTML code into your post or not. The default selection is 'Show HTML Literally' which will display any HTML tags used in the post as it is in the post when published. If user selects 'Interpret Typed HTML', then any HTML added to the post body will be executed in the published post. For example, if post body contains the text '<b>This is some text.</b>', by selecting the first option, this line will appear as it is, i.e., '<b>This is some text.</b>'. By selecting the second option, this line will appear as 'This is some text.'3. Line Breaks:
Choose to use '<br>' for line breaks or the Enter key.These are the post setting options which are available in the new Blogger layout. Try these out for more fun features.
Hi, comments are important feedback for us. Please let us know what you think about the article you just read and if it was useful to you in any way. Needless to say, please feel free to leave a message if you feel some area needs correction or update. Thank you for your time.


0 comments:
Post a Comment