How To Start A New Blog

Starting a new blog on any blogging platform requires a similar thought process. Follow these 5 simple steps to get your creative juices flowing to start your brand new blog.

5 Blogging Tips That Always Pay Off

Blogging is not just mere writing, it is an art. To be able to write down your thoughts in a way that other people can easily relate to is definitely a skill. These ideas are very easy to adapt, but also very rewarding as a writer.

Advanced HTML Image Editing In Blogger

Like any great blogging platform, Blogger offers you to add HTML for more stream lined posts at no cost at all! Because the best things in life are free!

This is default featured slide 4 title

Go to Blogger edit html and find these sentences.Now replace these sentences with your own descriptions.This theme is Bloggerized by Lasantha Bandara - Premiumbloggertemplates.com.

This is default featured slide 5 title

Go to Blogger edit html and find these sentences.Now replace these sentences with your own descriptions.This theme is Bloggerized by Lasantha Bandara - Premiumbloggertemplates.com.

Monday, March 11, 2013

How To Create Your Own Blog Button

You may have seen many blogs or personal websites where you see their logo or blog button up for grabs. They offer you a simple code that you can put into your blog/site code and their logo starts showing. What's more is that clicking on this blog button will take you to their site.

Wouldn't it be fantastic to have a similar site/blog button that people could come and grab? Not only is it convenient for visitors to follow, but it is also a good way to spread your link over the Web. It is doubtful anyone might be interested in a plain text link of your site, but when coupled with an attractive eye-catching logo/graphics, your link is sure to grab attention.

In today's section, we will show you how to prepare a blog button code up for grabs. This will assume that you already have a ready logo/button to work with.

Step 1: Host Your Image

1. To start with making our very own blog button, first we need to host our button image somewhere. For this, a very easy and free option is Photobucket.com. Go to the Photobucket home page and make a free account. If you use some other image hosting website, you can use that too. For beginners who know little about image hosting, Photobucket offers a very simple and free solution. This tutorial will use Photobucket in its steps.


2. Once you sign in into your Photobucket account, your Home screen will look a little something like the above image. Your last uploaded image will be visible as cover photo of your Photobucket album.

3. On the Home screen, locate the 'Upload' button. Click this button and the following screen will open.


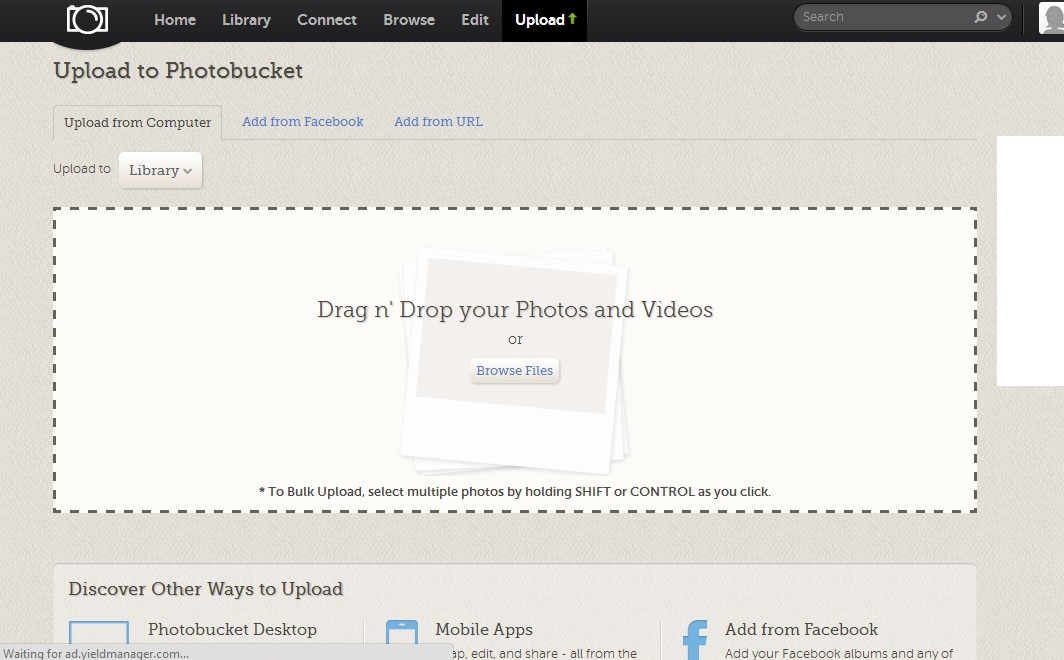
4. Using the 'Browse Files' button to locate your blog button image on your local hard drive and upload it to Photobucket.

Step 2: Getting Your Image URL

1. After successful upload, you will see a thumbnail view of the image you just uploaded.


2. Click on this thumbnail to open this file in full mode. The following screen shot shows this blog button image opened in full mode.


3. When this image is opened in full mode, you will see a number of different options on the right hand side. We are concerned only with the section 'Image Links' for now. Image Links section gives a number of different options like Email & IM, Direct Link, HTML Code and IMG Code.

4. Take your mouse cursor over the Direct Link text box and click once. This will copy this link to your clipboard and a message confirmation of successful copy will be displayed as well. You can paste this link in any other file for now in order to retain it.

Step 3: Preparing Grab Code For Your Viewers

In this step we will prepare an HTML code that will enable your viewers to have your button/badge on their site. This is the same code that you have seen on other people's site; you can copy it and after pasting it into your site code, their button/badge displays on your site too. Now it is time to make one for your own too, and it's very simple!

1. Prepare the following HMTL code for your blog button:

<br/><center>Just copy the code below and paste in your site code!</center><br/>
<form>
<center>
<textarea rows="3"><center>
<a href="your blog URL comes here" target="_blank">
<img alt="your blog name comes here" src="blog button image URL comes here">
</a>
</center>
</textarea>
</center>
</form>


2. In place of "blog button image URL comes here",i.e., for value of src, insert the URL that you have copied from 'Direct Link' in Step 2.

3. The value in alt is the text which will appear in tool tip, i.e., if you want a certain text to appear when a user hovers mouse over your button, you can enter that text here.

Step 4: Installing Your Blog Button For Grabs

To install your blog button, go to your Blogger Dashboard > Layout. Click on Add a Gadget > HTML/Javascript.

Add the following code to add a preview of your blog button for your users.
<a href="your blog URL comes here" imageanchor="1" style="margin-left: 1em; margin-right: 1em;"><img border="0" src="blog button image URL comes here" /></a>

This will insert your blog button preview for your users. (See below)

Now add the code discussed in Step 3 just below this image code. Your code should look like this:


<a href="your blog URL comes here" imageanchor="1" style="margin-left: 1em; margin-right: 1em;"><img border="0" src="blog button image URL comes here" /></a><br/><center>Just copy the code below and paste in your site code!</center><br/><form><center><textarea rows="3"><center><a href="your blog URL comes here" target="_blank"><img alt="your blog name comes here" src="blog button image URL comes here"></a></center></textarea> </center></form>


See the following screen shot of how this will look in Blogger:


Click save and refresh your blog to preview your new blog button. Here's how our new blog button looks like.


Doesn't it look neat? These are really four very simple steps. Take care in entering blog link and image links as it is easy to get them confused. Try out blog buttons for your site and don't forget to share with us what you come up with!

Till next time :)


Hi, comments are important feedback for us. Please let us know what you think about the article you just read and if it was useful to you in any way. Needless to say, please feel free to leave a message if you feel some area needs correction or update. Thank you for your time.

Sunday, March 10, 2013

Advanced Image Editing Options Using HTML

Hi friends. In our previous sections, we discussed how to add images to your Blogger posts as well as how to control images by Blogger delivered functions. Blogger provides pretty straight forward ways to perform both these different kinds of tasks. But how does an advanced user benefit from all that Blogger has to offer? Simple. If you know HTML, you can do lots and lots of cool things with your images. The best part is, HTML is a very friendly, easy to understand language which you can learn quickly with little effort.

In this post, we will discuss how to use HTML into having more control over how to display images in your posts. This post assumes you are familiar with the very basics of HTML and jumps directly to HTML for optimizing images in Blogger posts.

1. Linking Your Images To URLs

Often it is a good idea to link your images to a certain (usually external) URLs. This is easily done by the using the following tag.
<a href = "target URL here"> <img src = "image source link" /> </a>

2. Title Attribute

This attribute is good from SEO point of view. Enter a title for this image. The title should be such that it helps search engines easily know what your image is about.
<img src = "image source link" title="tulip-flowers" />

3. Alternative Attribute

This attribute further defines the Title attribute. You can think of this as a more descriptive image title. For example, the blog post discusses how to plant tulips can have the image titled "tulip-flowers", and its alternative attribute can be as follows:
<img src = "image source link" title="tulip-flowers" alt="Tips on how to plant fresh and vibrant tulips" />

4. Defining Your Own Image Width and Height

Blogger provides four standard sizes for images, Small, Medium, Large and X-Large, each with predefined width and height. Using the width and height attributes, you can define your own image size. See the following tag.
<img src = "image source link" width="width in pixels" height="height in pixels"  />

5. Using Image Spacing

Image spacing is more effective when your text is wrapped around an image. It gives a cleaner, neater look which is a good practice especially when you want a professional look.
<img src="image source link" vspace="5" hspace="10" />
The vspace and hspace attributes take values in pixels. This example shows that the vertical spacing should be 5 pixels and horizontal spacing should be about 10 pixels.

6. Adding Borders To Images

Add a border to your images for a more finished look by using the border attribute in your image tag.
<img src="image source link" border="1" />
This adds a 1-pixel border to your image. A border value of 0 (zero) results in no border at all. However, if there is no border specified or border=0 , and the image is attached to a hyperlink (see "Linking Your Images" above), then a 1-pixel border is attached to the image automatically.

7. Adding Color To Image Borders

If we want to have a border of certain color for your image, we need to use CSS. Using a CSS command on global level will make all images of the same specified border color. An easier way to achieve this is to write this CSS command inside our img tag. See the following HTML:
<img src="image source link" style="border: 3px black solid;" />OR<img src="image source link" border="3" style="black solid;" />
This tells our blog to put a 3-pixel solid line border of black color.

Width in style attribute can be in pixels, ems (e.g. 3ems) and percentage. Apart from "solid", other line styles can be solid, dotted, dashed, double, ridge, inset and outset.

These are just some of the ways you can play around with your images in Blogger posts. Play around with all these and combinations of commands to achieve high end blog posts. Needless to say, after mastering these basics, you can always go up to advanced image HTML.

Related Posts:

How To Insert Images Blogger
Having Fun With Images In Your Blogger Posts

Hi, comments are important feedback for us. Please let us know what you think about the article you just read and if it was useful to you in any way. Needless to say, please feel free to leave a message if you feel some area needs correction or update. Thank you for your time.

Saturday, March 9, 2013

Posting Options In Blogger

Apart from other options in a post, Blogger provides options that control the way user can choose to publish a post. These options are not related to the formatting or design to a post. This post discusses the way these different post options and how they work.

Adding Labels To Posts

Blogger enables user to add labels or tags to all posts. A label or tag is important to categorize your posts in any way you like. Not only do they help to classify posts, tags and labels are useful SEO practices as they help Google recognize what a blog post is about.

For example, a post called "How To Post Tulips In Your Backyard" can have the label "Flower". Other examples of labels for this post are Tulips, Gardening, How-To, Tutorials, etc. The list can consist of any word that qualifies being able to define what the whole post or any part of this post is about.

In order to add a new label into your blog post, click on the text "Label" in the right hand side pane of your Blogger post editor. This opens a text box area for you to enter a label or a group of labels (separated by comma) to enter. When you are done entering label(s) for this post, click on Done button.


You can always go back and add/edit/remove labels by clicking on the text "Label" in the Post Settings section and clicking Done button to confirm.

Blogger allows you to add phrases as labels. You can use spaces between words. Please read "Blogger Labels: Best SEO Practices" (coming in later sections) on how to create a label name.

Scheduling Posts

There are many cases when you may want to time your posts. Or you might be expecting a busy weekend, so you decide to write your weekend post a day or two before. Blogger helps users meet such varying requirements by giving them the facility to time or schedule their posts.

By default, post schedule is "Automatic" which means that the post is published when user clicks on 'Publish' button on top of the post editor. The image below shows Schedule tab in Post Settings section.


When user selects the option "Set date and time", Blogger displays date and time controls to the user. User can specify both the date and time of a post. Using the calender control, user specifies any date. If a user specifies a previous date or same date with some previous clock time, the post still gets published instantly. The only thing to keep in mind is that your Blogger blog will always display all posts in exact chronological order with respect to time and date.

When a user specifies a future date/time and clicks 'Publish' button, the post does not get published. It will be posted on the designated time. Till the time a post scheduled for some future time is published, Blogger list of posts displays this post marked as 'Scheduled'. See below.


Adding Custom Links To Posts

Blogger gives the facility to add custom links to posts. This is a recently added feature into Blogger. By default, the 'Permalink' section is set to Automatic Permalink. This setting takes the blog title of your post or the first few characters of the post content when there is no title and makes a post URL out of it.

The following image shows when user has added a post title. Blogger uses this title to create an automatic post URL.


If the user wants to add his or her own custom link, simply select the option 'Custom Permalink'. User enters a custom link (ideally separated by dash '-' ) and clicks on Done button.


See more on how to construct meaningful and SEO friendly URLs for your posts in the coming sections.

Adding Location To Posts

Use the 'Location' section in Post Settings panel to add location to your posts. This widget enables a user to search for a location, zoom in and zoom out a location on map as well as toggle between two views: Map and Satellite. You can find a location by moving the map with the hand cursor and zooming in/ zooming out or you can type a location name and search for it.


When you find your desired location, click on 'Done' button. This will append your specified location with the post when it is published.

You can always come back and edit this location if changes are needed.

More Post Options

Apart from the posting options just described above, Blogger sums up some miscellaneous options into the section 'Options'. This section includes the following options:

1. Reader Comments: 

Change this option to suit whether you want people to be able to add comments to this post or not.

2. Compose Mode:

Choose to whether display HTML code into your post or not. The default selection is 'Show HTML Literally' which will display any HTML tags used in the post as it is in the post when published. If user selects 'Interpret Typed HTML', then any HTML added to the post body will be executed in the published post. For example, if post body contains the text '<b>This is some text.</b>', by selecting the first option, this line will appear as it is, i.e., '<b>This is some text.</b>'. By selecting the second option, this line will appear as 'This is some text.'

3. Line Breaks:

Choose to use '<br>' for line breaks or the Enter key.

These are the post setting options which are available in the new Blogger layout. Try these out for more fun features.

Hi, comments are important feedback for us. Please let us know what you think about the article you just read and if it was useful to you in any way. Needless to say, please feel free to leave a message if you feel some area needs correction or update. Thank you for your time.

Sunday, March 3, 2013

5 Blogging Tips That Always Pay Off To Remember

Blogging is not just mere writing, it is an art. To be able to write down your thoughts in a way that other people can easily relate to is definitely a skill. To achieve a desirable balance, not only look through all your designing aspects, but develop an assertive and appealing balance in your writing as well.

This post, and others in this series, will help a beginner to gain the poise and balance. If writing comes naturally to you, then a little conscious effort is all it needs to get you started in the right direction. The first in this series is more of an umbrella post where we talk of blogging in a general way, so don't fret if what you read here gets a little confusing to comprehend. In later parts of this series, we will break down each point and be specific.

This list is by no means sorted and each point carries equal weight in terms of importance.

1. Be You

According to the old blogger in me, this is by far the best tip I can offer my readers. Articles that sound too stiff and formal tend to lose interest with the audience. People want to know first hand personal experience, not strict facts. They like it when they read something they can relate to and that's what makes the connection between you and your reader. If you sound honest, friendly and open, you are all the more likable  Concentrate on building returning readers rather than the ones who come stumbling by to your page and leave with anything that sticks to their mind. Make a human connection. That will get you far.

2. Put your best foot forward

Instead of looking for a really flashy topic to write on, stick to the simple ones if that's what you do know. How you make an ordinary topic special is all up to you. Writing is just like a painting. An artist can choose an every day scene that will be dull to many, but how he executes it will make it special. Similarly, a writer, quite synonymous to a painter, can make a simple topic very appealing by his/her writing style. Focus on building a style for yourself as you grow as a blogger. and don't forget what you already know from point 1!

3. Hold back the Shakespeare in you

Old literature classics are addictive; and what is most appealing is the style of classic English. But to write in that way on a modern day blog seems irrelevant. A reader cannot connect unless you offer something easily understandable to him. What's more? Your reader may not even bother with your blogs if language remains a constant barrier. Use easy to understand language and simple expressions. If you must write something fancy, then try to balance it out somehow.

4. Keep it short and concise

Gone are the days when people take out time to read long stories on the net. We are probably the most impatient generation of all time. We want everything fast and simple and short and sweet. Keep that in mind when writing a blog post. A post that fails to deliver some idea in the first few lines tends to lose more readers. Keeping your short and concise is one way to make your posts friendly and readable. If there are facts, bullet the out. If you are discussing more than one idea in a single article or if there are different angles to it, make heading and insert paragraphs. the whole point is to make your ideas stand out and to de-clutter then by avoiding fancy details altogether.

5. What are you offering your reader?

When writing or planning to write each post, keep one question in mind: what are you offering your readers? Readers will come back for more when they feel you have something to give them. Make sure anytime they come to your blog space, they don't leave empty handed. That's a sure shot way of earning yourself a returning reader who will most probably now recommend you to his or her circle of friends.

--
Like I said, these are some umbrella tips to keep in mind when writing posts of any kind. These can be applied to any kind of blog and any kind of topic. Start practicing these ideas in your daily writing and you will find that not only they are very easy to adapt, but also very rewarding as a writer.

Happy Blogging!

How To Insert Images In Blogger

Among many free features that Blogger provides for beginner bloggers, one main feature is that of inserting images and some preliminary related functions. The purpose of these functions is to help newbies come up with more professional looking blog posts. Till you get the overall hang of Blogger and the related advanced HTML, these basic image features will cater to your needs fun. We will look into more advanced image controls in later section.

--

The Insert Image control comes with part of the Blogger defined post editing options. See this post for more information of other controls on this panel. The following image shows the Insert Image button.


Clicking this button opens a dialog box that provides user different ways to add images. The default selection is 'Upload' since it is the most commonly used way to add images.


Upload Images In Blogger Posts

Using the 'Choose files' button in Upload tab enables the user to upload files from the local disk to Blogger server. Typically each blogspot blog is linked with a Picasa Web album and this is where these images will be available after uploading. These albums are by default private; you choose to make them public as per your choice.

Clicking on 'Choose file' button will open a dialog box which you can use to access a single or multiple image files from your local disk as shown below.


Click on 'Open' and the file(s) starts uploading on Blogger as shown below.


When the image(s) finishes uploading, a preview is available as well as the most recent uploaded images are by default selected. Clicking the 'Add selected' button will insert the selected image(s) in our post.


In case we want to insert multiple images into the blog post at the same time, we can upload multiple files in one go and select all their image previews simultaneously. Following image shows the image we have just inserted in our post.


We have successfully added a new image in our blog post using the Upload option.

Using Previously Used Images in a Blogger Post

There might be times when you need to refer to a previous image in a new blog post, say, you need to refer to an image of a spread sheet that you want to discuss in your current post as well. For this purpose, the 'From This Blog' option works well. This is a more efficient way than uploading the same image(s) again and is more effective when there are multiple images instead of a single one.

Selecting the 'From The Blog' tab in the Select A File dialog box will open up previously uploaded image files in Blogger. This album view is offered by the Picasa Web album of your blog.


Select the images you want to reuse by clicking on their preview thumbnails and click 'Add selected'.

Using Images from Other Picasa Web Albums

All photos of all blogs linked to a single Blogger account can be used within other blogs of the same account.  Each blog will have a separate Picasa Web album belonging to it. If, say, you want to use a certain image from blog1 for a post in blog2, then the option 'From Picasa Web Albums' will come in handy.

The image below shows all Picasa web albums linked to the user's Blogger account. The user can then choose the album of his/her choice and select the desired image(s). On clicking the 'Add selected' button, the image(s) can be easily inserted into the blog post in blog2.


When user clicks on any of these album covers, all images in the album are loaded. He can then select the image of his choice and insert it in his post.

Inserting An Image From The Web

In addition to adding images from Picasa or uploading them, Blogger also gives us the advantage of selecting any image found on the web and then adding it into our blog posts. For this purpose, the option used is 'From a URL'.

User enters the image URL and Blogger will load that image for him. Then it can be easily inserted. To find the correct URL of an image, right click on the image and select 'Copy Image URL'. This is the method for Google Chrome. Other browsers may have slight variations. See below:


Now we will add this image into our new blog post using the 'From a URL' option.


If the image URL is correct, a preview will be displayed as shown above as well as a green tick that shows image correctness, availability, etc. By selecting the image and clicking on 'Add selected' button will insert the image into our new post.

Uploading Images By Webcam and Phone

These are the newest two options for uploading photos on your blog. It is an easy way to upload photos when you are travelling and need to blog on the go. The 'From your webcam' options works with a webcam device attached to your device. Click on 'Allow' to allow Blogger.com to access images via your webcam.


On the other hand, you can access images on your phone by using the 'From your phone' tab. It requires you to download the Google+ application for your Android phone or iPhone. The photos you click and/or the images already contained in your phone will then be accessible on this window pane. Selecting any image(s) and clicking on the 'Add selected' button will insert them into your post.


--

As you can see, Blogger provides a good variety of ways in which you can insert images in your post. All facilitate use ease and comfort. Once an image has been added to a post, there are a number of different ways you can use images in your post. Stay tuned for more!


Hi, comments are important feedback for us. Please let us know what you think about the article you just read and if it was useful to you in any way. Needless to say, please feel free to leave a message if you feel some area needs correction or update. Thank you for your time.

Having Fun With Images In Your Blogger Posts

In the previous section, we learnt how to insert images in a Blogger post. Blogger offers us a neat variety of ways by which to add images to our posts to make them look more professional. Some of them, besides uploading are, inserting from Web, phone and webcam.

In this section, we will review some basic features offered by Blogger to make use of the images we have just added in our post. These are very simple to learn and help users gain some control over the look and feel of their posts despite the fact that they must be beginners. For more control (advanced topics), we will discuss in later sections.

Image Controls In Blogger

To start using different controls that Blogger has provided for images, all you need to do is click on the image. This will highlight the image and open a set of controls. See below for illustration.


TYPE FEATURE DESCRIPTION

Image Size

Small Reduces image to the smallest size available where height is 150px and width is 200px.

Medium This is the default size into which an image is loaded when it is inserted into the post editor. Medium size has a height of 240px and width of 320px.

Large A Large image has height of height of 300px and width of 400px

X-Large X-Large image has height of 480px and width of 640px

Original Size Restores the image back to its original size.
This may or may not fit the post editor window as well as when blog is rendered.

Image Alignment 

Left Left aligns the image in the post editor

Center Center aligns the image in the post editor

Right Right aligns the image in the post editor

Image Properties

Add Caption Enables the user to add a caption to an image. Captions are good for better understanding of what the image is about as well as for useful SEO purposes.

Properties This contains two major image properties that are also basic to image SEO.
1. Title text: Properly naming an image file can help search engines find it easily on the web. An image file name should be to the point and concise with words separated preferrably by use of dash '-'.
2. Alt text: The alternate text property further aids the 'title' property. Using this feature, you can further define what your image is about. For example, an image containing tulips can have Title property as "how-to-grow-tulips-tutorial.jpg" and the Alternate text that explains this more can be "Step by step guide to planting bright tulips in your backyard". 

Remove Removes image from the post editor but does not remove it from Picasa Web album.


These image controls are pretty straight forward and simple, yet they give an adequate control over to the user. More image control is acquired by the use of HTML. This HTML code is easily written in the 'HTML' tab of the post editor. We will discuss HTML for beginners in the coming sections; quite much can be acquired even with a basic knowledge of HTML.

Enjoy using images in Blogger and plan around more to get the hang of it. You will love it!

Hi, comments are important feedback for us. Please let us know what you think about the article you just read and if it was useful to you in any way. Needless to say, please feel free to leave a message if you feel some area needs correction or update. Thank you for your time.

Saturday, March 2, 2013

How To Start Posting On Blogger - For Beginners

Composing and publishing a post on Blogger is very easy to understand for beginners. At the same time, it offers features that a more advanced user can use for more advanced purposes. In this article, we will focus on posting on Blogger for beginners and will discuss some basic features that such a beginner might need.

Path 1: New Post Editor from Bloggr Home Screen

Start by clicking on the 'pen' button corresponding to your new blog. This is the 'New Post' button that you an access from your Blogger home screen.


Path 2: New Post Editor from Blogger Posts List

Another way is to open your blog's post list, which is empty for now. Click open the drop down menu and click on 'Posts'.


This will open your post list which will be empty as shown below. In case there are already some posts, they will all appear on the right hand side pane of this window in chronological order of their creation.


You can see that this screen contains more buttons for New Post buttons. Clicking any of these buttons or the button shown in image for Path 1 will open the New Post editor for you. Furthermore, the link "Create a new post" will serve the same purpose. See below:


The 'New Post' Editor:

Here is the editor screen. Click to enlarge.


You can use this editor to insert basic text and to add different media like photographs and videos. There are a couple of different ways you can format your text with size options, font styles, paragraph, block quote and bullets etc. What really makes Blogger so easy and flexible is that it gives you the option to go into the HTML side of your composition and do all sorts of things with your posts that you would do with normal HTML. Pretty cool, han?

Formatting Options in Blogger Post Editor


Blogger post editor comes with a small set of formatting options for beginners who are not familiar with how HTML tags work. Due to this, even first time bloggers can make professional looking blog posts. In later sections, we will see how to incorporate almost any kind of HTML in our posts to achieve high-end, superbly presented blog posts.

Blogger provides two types of views in its post editor. Already provided formatting options are available for the 'Compose' tab where user gets to see how blog text will actually appear in the post. We discuss this section for now. All we do here can be seen in HTML format by clicking on the HTML tab just next to the Compose tab. We will leave the HTML tab for advanced levels.

The following image illustrates already delivered features in Blogger's post editor. (click to enlarge)


Here are the text effects of these features:

Font Style:

This text is in default font style of the blog template.

This text is in Courier font style.

Text Size:

This text is in the default text size of this blog, i.e., Normal.

This text is changed to the largest text size this editor offers.

Headings:

This text shows the actual heading. 

This text shows subheading.

This text shows minor heading.

This is normal text.

Text Styles:

This is plain text.

This text is italicized.

This text is bold.

This text is underlined.

This text uses strike through.

This text is plain, bold and underlined.

This text is italicized, bold and underlined.

This text is plain, bold, underlined and strike through.

This text is italicized, bold, underlined and strike through.


Text Color:

This text is in red.

Text Highlight Color:

This text is not highlighted in any color.

This text is highlighted in color.

Hyperlinks:

This text is a link.

Text Alignment:

This text is left aligned.

This text is center aligned.

This text is right aligned.

Bullets and Numbering:

The following list is numbered.
  1. Point 1
  2. Point 2
  3. Point 3
The following list is in bullets.
  • Point 1
  • Point 2
  • Point 3

Block Quotes:

This text is in block quotes.

Hope this post was helpful. For any queries, use the comments section.